Back when Cloudflare announced free SSL, I tried to use their flexible SSL option, which is suitable for when:
You cannot configure HTTPS support on your origin, even with a certificate that is not valid for your site. Visitors will be able to access your site over HTTPS, but connections to your origin will be made over HTTP.
I don’t remember the exact issues I faced, but I concluded that I wouldn’t try again until I had a proper SSL certificate installed on my server.
I’d pretty much forgotten all about getting SSL, but Google’s push for all websites to have SSL has urged me try again. A lot has changed since then, including the launch of Let’s Encrypt and my now using Serverpilot.
I manage a couple of websites using the free plan of Serverpilot, which doesn’t provide a way to automatically configure SSL certificates on your servers. So, here’s how I managed to install Let’s Encrypt SSL certificates on my servers on the free Serverpilot plan on sites already active on Cloudflare.
But first, a brief introduction to those services in case you don’t know what they are:
Let’s Encrypt – provides free, automated SSL certificates.
Serverpilot – is a secure control panel optimized for hosting WordPress and PHP websites on cloud servers.
Cloudflare – is a CDN & security provider that protects and accelerates any website online.
All of these services have tiers that are free and paid.
Ok, let’s start:
For your own purposes, please change the following when applicable:
appname to your own Serverpilot app’s name
user@domain.com to your email address
example.com to your domain name
1. Sign in as root using SSH:
ssh root@yourserverip
2. Download the Let’s Encrypt client from its GitHub repository:
git clone https://github.com/letsencrypt/letsencrypt
3. Enter the newly downloaded directory:
cd letsencrypt
4. Execute the downloaded client and set a couple of flags:
To add additional domains/subdomains, add an additional -d www.example.com
./letsencrypt-auto certonly --webroot --webroot-path /srv/users/serverpilot/apps/appname/public --renew-by-default --email user@domain.com --text --agree-tos -d example.com
Ok, you should have your SSL certificates ready to use. You should’ve received an onscreen confirmation message like so:
Congratulations! Your certificate and chain have been saved at:
/etc/letsencrypt/live/appname/fullchain.pem
Your key file has been saved at:
/etc/letsencrypt/live/appname/privkey.pem
Your cert will expire on YYYY-MM-DD. To obtain a new or tweaked
version of this certificate in the future, simply run
letsencrypt-auto again. To non-interactively renew *all* of your
certificates, run “letsencrypt-auto renew”
Now, we need to configure the server to use the SSL certificates:
5. Go to the nginx configuration directory:
cd /etc/nginx-sp/vhosts.d
6. Create/edit a new configuration to use:
sudo nano appname.ssl.conf
7. Paste the following in:
server {
	listen 443 ssl http2;
	listen [::]:443 ssl http2;
	server_name example.com;

	ssl on;

	# letsencrypt certificates
	ssl_certificate      /etc/letsencrypt/live/appname/fullchain.pem;
	ssl_certificate_key  /etc/letsencrypt/live/appname/privkey.pem;

        #SSL Optimization
	ssl_session_timeout 1d;
	ssl_session_cache shared:SSL:20m;
	ssl_session_tickets off;

        # modern configuration
	ssl_protocols TLSv1 TLSv1.1 TLSv1.2;
        ssl_prefer_server_ciphers on;

        ssl_ciphers 'ECDHE-RSA-AES128-GCM-SHA256:ECDHE-ECDSA-AES128-GCM-SHA256:ECDHE-RSA-AES256-GCM-SHA384:ECDHE-ECDSA-AES256-GCM-SHA384:DHE-RSA-AES128-GCM-SHA256:DHE-DSS-AES128-GCM-SHA256:kEDH+AESGCM:ECDHE-RSA-AES128-SHA256:ECDHE-ECDSA-AES128-SHA256:ECDHE-RSA-AES128-SHA:ECDHE-ECDSA-AES128-SHA:ECDHE-RSA-AES256-SHA384:ECDHE-ECDSA-AES256-SHA384:ECDHE-RSA-AES256-SHA:ECDHE-ECDSA-AES256-SHA:DHE-RSA-AES128-SHA256:DHE-RSA-AES128-SHA:DHE-DSS-AES128-SHA256:DHE-RSA-AES256-SHA256:DHE-DSS-AES256-SHA:DHE-RSA-AES256-SHA:!aNULL:!eNULL:!EXPORT:!DES:!RC4:!3DES:!MD5:!PSK';

        # OCSP stapling
        ssl_stapling on;
        ssl_stapling_verify on;

        # verify chain of trust of OCSP response
        ssl_trusted_certificate /etc/letsencrypt/live/appname/chain.pem;

        #root directory and logfiles
        root /srv/users/serverpilot/apps/appname/public;

        #index files
        index index.php index.html index.htm;

        access_log /srv/users/serverpilot/log/appname/appname_nginx.access.log main;
        error_log /srv/users/serverpilot/log/appname/appname_nginx.error.log;

        #proxyset
        proxy_set_header Host $host;
        proxy_set_header X-Real-IP $remote_addr;
        proxy_set_header X-Forwarded-For $proxy_add_x_forwarded_for;
        proxy_set_header X-Forwarded-SSL on;
        proxy_set_header X-Forwarded-Proto $scheme;

        #includes
        include /etc/nginx-sp/vhosts.d/appname.d/*.nonssl_conf;
        include /etc/nginx-sp/vhosts.d/appname.d/*.conf;
}
Note:
A) This configuration is copied from https://bjoernfranzen.com/how-to-set-up-a-letsencrypt-ssl-certificate-for-your-wordpress-website-on-a-digital-ocean-server-managed-with-a-serverpilot-free-account/, an excellent write-up and a worthwhile read.
B) I added the #index files section as my server was causing index files to save on my browser’s downloads folder and was not simply opening them in the browser.
C) to add additional domains/subdomains, simply list them on the server_name line, like so: server_name example.com www.example.com;
8. Restart nginx
service nginx-sp restart
On the cloudflare side, be sure to switch SSL on via the Crypto tab, like so:
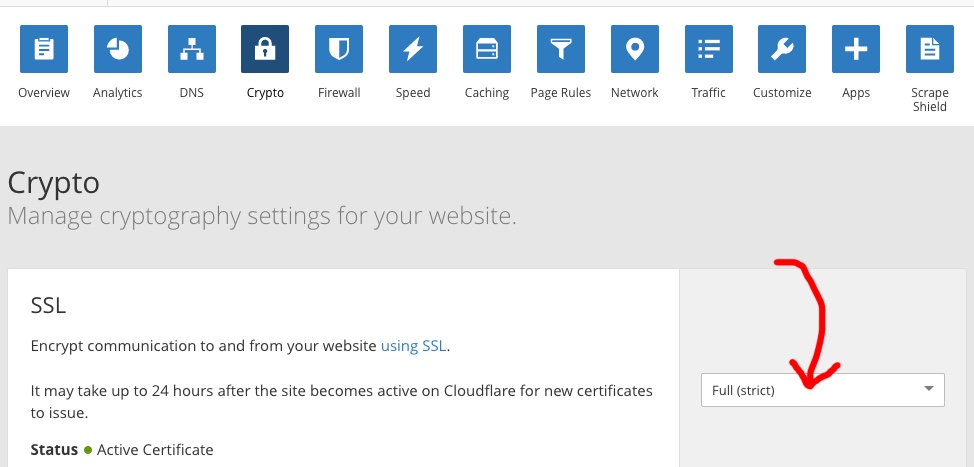
And that’s it! Go to the https:// version of your website to test. If you’re using WordPress, the Really Simple SSL pluginis an excellent plugin to use to rewrite all your URLs and generally use SSL on your website.
Renewing all your certificates is as easy as SSH’ing as root again and using:
cd letsencrypt
./letsencrypt-auto renew


