
Background
I’ve been playing around with Jamstack sites and really like them. Yes, I was interested in a few of the JS frameworks but nothing like this. Those frameworks fell short with on-site SEO. Sure, ways around the SEO issues were developed later on but I haven’t seen or heard of them proving they worked thru SEO experimentation. Not that I looked too deep, just a few times here and there. Anyway, I never did get to really learn any of them because of this and thus haven’t moved far from my WordPress focus.
Until now. I like Gatsby but am really enjoying Hugo. I also found Stackbit, which helps you set-up Jamstack sites. It makes setting new production sites as easy as click, click, click – choose a theme, what SSG (static site generator, Hugo is my current choice) to use, which headless CMS to use, and connect your github and Netlify hosting accounts – and it auto-magically sets it all up for you.
So much more can be said about Jamstack and what makes it so great, but that’s not what this post is about.
The problem
As a dev working on a site, I need to be able to work on its theme and to do so I need to be able to work on it locally. Stackbit provides instructions for how to do this but I hit a wall because it doesn’t work on Windows (no issues getting it working on my Mac). Googling didn’t find me any help, so am documenting what I did to help others and my future self.
To be clear, I used Stackbit to start a Hugo site paired with the Netlify CMS. It works great in production but I couldn’t get the site to work locally in my Windows machine. The git repo for the site (created in my Github account by Stackbit) has the following instructions:
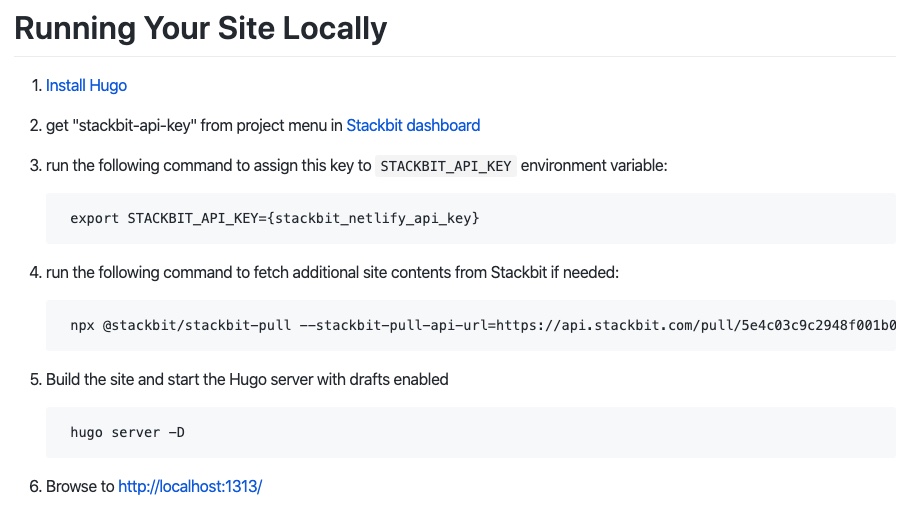
In a Windows machine, steps 1 and 2 are no problem. Step 3 and 4 (maybe) won’t work as the instructions are for Macs. I should note that you already should’ve cloned your site’s repo locally. So what to do…
The solution
STEP 3
The ‘export’ command doesn’t work in Windows. This command is for assigning environment variables. To assign environment variables in Windows, follow the instructions here. Add a new variable STACKBIT_API_KEY with your API key as the value.
Skipping step 4, the site will run fine. Run ‘hugo server -D’ in the root folder of your site. Go to https://localhost:1313/ to see the local version of your site. Edits to files immediately appear. I got an error trying to use the local Netlify CMS at https://localhost:1313/admin, so I proceeded with step 4.
STEP 4
If you have Node installed, then this step should work for you. Otherwise, install Node first. I have chocolatey installed so I used choco install nodejs in PowerShell. Restart your computer and test Node to make sure it is installed.
In PowerShell, go to your site’s folder and run the command for Step 4. Then start up your site with the ‘hugo server -D’ command.
The local site ran fine again but trying to login to the local CMS still gave me an error. I revisited the admin URL again (https://localhost:1313/admin) and it logged me in.
A note on using the local CMS while working on the local site: Making content changes will cause it to commit to the live Github repo, which will then deploy changes to your live website. Therefore, don’t use the CMS if you’re testing locally. Use your local tools to work on the theme and content files.


